Yes. QwickPAY for iOS and Android both accept card-present EMV transactions using eDynamo (via the Bluetooth interface). The QwickPAY Virtual Terminal accepts card-present EMV transactions using eDynamo, DynaPro and DynaPro Mini (all via the USB interface)
As of August 2019, QwickPAY accepts both card-present, contact EMV chip cards and contactless/NFC payments, provided the QwickPAY account has selected one of MagTek’s L3 Certified EMV Processors.
Yes, as of August 2019 QwickPAY accepts Contactless EMV and NFC payments.
QwickPAY is a complete payment solution with a broad range of compatibility, allowing your browser-based, iOS, Android, and other mobile smart phones to evolve into a highly secure payment system. With QwickPAY, you can easily accept credit and signature debit sales anytime, anyplace.
The QwickPAY interface safely handles the communication between your device, MagTek's secure card reader authenticators, the QwickPAY Payment Protection Gateway, and Magensa.net. MagTek's SCRAs are easy to install and even easier to use; simply plug the SCRA into your device or pair its Bluetooth connection and you are ready to accept authentic, card present transactions.
QwickPAY brings convenience back to POS without sacrificing security. When your customers want to pay with a card, QwickPAY is the safest way. Here are some of the advantages to using MagTek's QwickPAY application:
Savings: Merchants can lower their cost of accepting cards by as much as 30% while eliminating the costs and hassles related to the charge back process.
Fraud Prevention: Never accept a fraudulent or skimmed card! QwickPAY makes card present transactions easy to accept with security designed to simply decline counterfeit cards.
Beyond PCI: QwickPAY surpasses the PCI DSS standards by combining multi-layered MagneSafe security and protects sensitive card data from the point of swipe.
QwickPAY is available with pricing and contract options designed to meet your needs. When you set up your merchant account, we will provide you with the best options to meet your business needs. QwickPAY does not lock you in to long term plans or penalize you if you decide not to use the Payment Protection Service.
No, a basic data access phone is sufficient.
Yes. The QwickPAY Payment Protection Gateway is PCI compliant and its redundant facilities are routinely audited by industry accredited professionals. QwickPAY is validated against the PCI SSC's (PCI Security Standards Council) strict regulations. The PCI SSC sets the standards that payment system vendors must follow when developing hardware and software. As part of the security standards, your customer's account information is truncated on all data fields and reports.
In addition, QwickPAY always provides "end-to-end" transaction security by leveraging strong encryption, a unique encryption key per swipe, immediate card data tokenization and card authentication with dynamic signatures. This exclusive QwickPAY feature literally protects your customer's information at the exact instant it is swiped and further detects whenever a counterfeit payment card is presented so it can immediately be declined.
MagTek leads with "Security from the Inside", which is why we've built industry-leading technology into QwickPAY. From the ground up, the entire system allows you to leverage a layered approach to card data security.
Unlike competitive devices that offer proprietary encryption using a static encryption key, or a session key that only changes once a day, QwickPAY delivers encrypted data based on Triple DES - an ANSI/ISO open standard, and a unique key per swipe. This method of encryption and key management is regarded as "best practice" by industry experts. Other competitive offerings that do not change the encryption key with every swipe cannot offer the same level of security and can leave you exposed to fraud. QwickPAY uses SCRAs which protect the data from deep inside the magnetic head. Additional capabilities allow QwickPAY to generate dynamic payment card data using existing magnetic stripe cards. This dynamic data offers a robust solution for immediate tokenization of the card data while further allowing the card to be authenticated in real-time to ensure it is not a fraudulent or skimmed card.
Unlike competitive systems that use proprietary encryption schemes, QwickPAY uses strong encryption based on open standards and a unique encryption key per swipe. This is the same process in use today at ATM's and traditional Point of Sale Terminals that you use every day at large retail locations around the country - only stronger.
QwickPAY supports credit card, signature debit card, manual entry, remote invoicing for an eCommerce experience, and QR Codes via invoicing transactions for magstripe, contact EMV cards, and NFC/EMV contactless payments.
Merchant service providers provide the financial linkage between you, your customers, your bank and the credit card companies. Fees and fee structures will vary, but you can expect that every merchant processing account will include:
Discount Rate: This is the percentage of the transaction amount you will be billed for the transactions you process. Rates vary based on certain risk criteria usually categorized into "Qualified", "Mid-Qualified" and "Non-Qualified" tiers. In addition, rates vary depending on your type of business, whether or not you swiped the customer's card through the reader and other factors that can be explained in further detail by your merchant account provider.
To ensure that you get the lowest fees possible, always swipe the customer's card through the SCRA, and be sure to include all the required information whenever processing a transaction.
An EMV-ready QwickPAY Processor, QwickPAY Merchant Credentials that start with QPP and NOT MAG; a eDynamo or DynaPro device loaded with QwickDip firmware, Magensa’s default EMV tag load for the respective card readers.
The Merchant Nickname is a new feature that lets the merchant choose a unique nickname name that can then be used login into QwickPAY instead of using the system generated QwickPAY Merchant ID.
Login to the QwickPAY Virtual Terminal at https://myqwickpay.com. Use the main navigation menu and go to Admin - Change Password. There you can Change your QwickPAY Merchant Password and/or enter a desired QwickPAY Merchant Nickname (Friendly Name). Next, press the Update button. If your Nickname is not already used, it will be Saved to your profile. Once successfully saved, you will then be able to use the QwickPAY Merchant Nickname in place of the QwickPAY Merchant ID when logging into the QwickPAY Virtual Terminal. Note: When logging into the QwickPAY Virtual Terminal, be sure to enter your login information in the appropriate login field (i.e., enter the QwickPAY Merchant Nickname into the QwickPAY Merchant Nickname field and not into the QwickPAY Merchant ID field).
The QwickPAY SCRA is available through select MagTek distributors or online at https://www.qwickpay.com/qpos/. The application is available on Apple App Store, Google Play Store, Amazon App Store and https://myqwickpay.com.
Setting up a merchant account is a simple agreement between a retailer or merchant (like yourself), a merchant bank and a payment processor for the settlement of credit card and/or debit card transactions. Please complete the online form. Once you complete the form, a MagTek representative and one of MagTek's approved Merchant Services Providers will contact you to complete the application process.
Activating a Merchant Account is similar to applying for a credit card. Please have the following information ready:
- Contact details and business name
- Locations and products and/or services
- Annual Business stats
- Complete business owner contact details including social security or tax ID number
- Bank details including ABA and DDA numbers
If you already have a Merchant Account (meaning: you already have an agreement between yourself, a merchant bank and a payment processor for the settlement of credit card and/or debit card transactions), you are well on your way to accepting card present transactions anytime, anywhere.
QwickPAY is MagTek's Protection Gateway powered by the security services of Magensa.net. These services include encryption, tokenization and authentication of the transaction using dynamic data during payment processing. Since our Payment Protection Gateway is certified to process with virtually any payment processor, it is very likely that you can maintain your existing merchant account.
Please complete the online form.
Yes, QwickPAY works in concert with a merchant services provider. The QwickPAY Payment Protection Gateway service provided by MagTek will be in addition to your normal card processing rates. In some cases, the QwickPAY fees will be contained on the same statement as the traditional card processing fees.
Yes, for the protection of the cardholder data you acquire during a transaction, the data must travel to QwickPAY for decryption and authentication. Once it has reached QwickPAY it can be routed to your existing PCI compliant payment processor or onto another PCI compliant payment gateway.
Once you have set up your account with QwickPAY, you may change your password by logging into the Virtual Terminal with the credentials originally provided. After you login to the Virtual Terminal, click on "Administration" under the Account menu on the left-hand side of the web page. When you change your password in the Virtual Terminal, you will also need to change it on your mobile device. Open the QwickPAY application on your device and tap on "Merchant Info" from the Main Menu to enter your new password.
NOTE: When you change your password on the Virtual Terminal, please make sure you also change your password in the application on your phone. QwickPAY customer service will not be aware of your new password so please be sure to keep a record of this in a safe place for future reference.
QwickPAY is compatible on a Windows platform with Internet Explorer 9 or higher, Firefox, Chrome and Opera. QwickPAY is compatible on a Mac OS X (10.8.5) platform with Safari, Firefox, Chrome and Opera. Simply navigate your browser to https://MyQwickPAY.com and login to the Virtual Terminal using your Merchant Account credentials.
You also have the option to demo the QwickPAY browser-based application so you can familiarize yourself with the application once you get the SCRA or after. Click on the link above and use the following login credentials:
QwickPAY Merchant ID: demo
QwickPAY Merchant Password: Go4QwickPAY!!!
Currently, the MagTek readers that can accept Contactless EMV and NFC payments are tDynamo, DynaPro Go, iDynamo 6, kDynamo, DynaProx, and DynaFlex II Go.
eDynamo works with QwickPAY Mobile for iOS and Android via Bluetooth. eDynamo and DynaPro work with QwickPAY Virtual Terminal via USB.
Browse to https://www.magtek.com/support/edynamo/firmware and follow the instructions. Note, you will also need the Magensa default EMV Tags.
Browse to https://www.magtek.com/support/dynapro/firmware and follow the instructions. Note, you will also need the Magensa default EMV Tags.
MagneFlex Navy (https://magneflex.magtek.com/setup.exe) works best and is REQUIRED for all transactions involving EMV payments. Other browsers such as Internet Explorer and Firefox can be used for all other types of transactions.
Yes. Go to Settings and Reader Configurations in the QwickPAY Virtual Terminal and choose how to connect to your card reading device and then press the Submit button. Note, you will ALSO need to configure the MagneFlex Navy to select your card reading device.
iDynamo
cDynamo
eDynamo
kDynamo
sDynamo
tDynamo
DynaPro Mini
DynaMAX
eDynamo
tDynamo
DynaPro Mini
DynaMAX
IPAD® (USB HID / USB KB)
DynaPro (USB HID / Ethernet)
DynaPro Mini (USB HID )
DynaPad (USB HID / USB KB)
Dynamag (USB HID / USB KB)
BulleT SPP (USB HID)
BulleT KB (USB HID)
eDynamo (USB HID)
tDynamo (USB HID)
The card needs to be swiped through the card path where the magnetic stripe is facing toward the magnetic sensor. The card should be swiped in either direction with a smooth, continuous motion.
First make sure that your BulleT magnetic swipe reader is fully charged, which takes about two hours total. You can charge the BulleT by connecting it to any USB port on a PC with the provided USB cable. When the amber light in the top left-hand corner of the BulleT remains a solid amber color (not flashing) then it is fully charged and ready to use.
Turn the BulleT on by pushing the small button in the bottom left-hand corner. When the LED light flashes green this indicates the BulleT is now on. NOTE: The BulleT has an automatic shut-off time of one minute to conserve battery life.
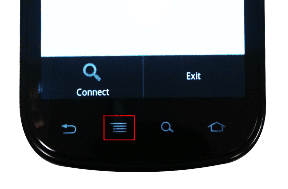
1. Pull up Applications or Menu and select Settings
2. Select wireless and network
3. Select Bluetooth settings
4. Turn on the BulleT reader; a green light will flash when the device is trying to connect
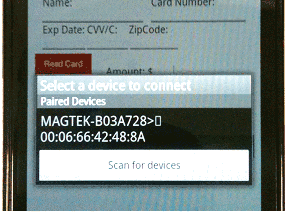
5. Select Scan for devices
6. Select the MagTek device when it appears on the screen
7. The screen will prompt you for a PIN (the default is 1234)
8. At this point the device is paired but not connected to QwickPAY
9. Go to the QwickPAY Application
10. The top red bar shows the device is not connected
11. The top green bar shows the device is now connected
12. The device is now ready to use.
Once you are connected, the QwickPAY app will display a green bar at the top of your screen which reads "Device Connected". You will also notice that the green LED light on the BulleT has stopped flashing and is now a solid green light.
With the QwickPAY app open on your Android device, when you swipe a credit card you will now see the data populate into the appropriate fields. The BulleT will shut off automatically after a successful swipe, or after one minute when it is not in use.
If you need technical support and the FAQs and user guide are not enough, please contact our support staff at (651) 415-6800 or support@qwickpay.com. Please have your BulleT charged and the QwickPAY application downloaded before calling MagTek so that we may assist you as quickly as possible.
Attach the iDynamo to the iOS device. Launch QwickPAY and tap on MENU. Then tap on QWICKPAY SETTINGS. Select the iDynamo device ("On"). Then press DONE.
Yes, in the iOS version, after you e-mail the receipt you can also optionally print the receipt to any available AirPrint printer. If you want to print to a non-AirPrint enabled printer like a Star TSP100 futurePRNT, there are 3rd party tools that can be used to emulate Apple’s AirPrint (see FingerPrint by Collobos as an example)
Under "QwickPAY Settings" change "Receipt Printing" to ON and QwickPAY will automatically prompt you to print a receipt after each transaction. You can also set the number of copies you wish to print.
A record of each transaction is also available in the application and the QwickPAY online portal, where you can reprint receipts and view transaction history.
Yes. When installing on a Windows 7, 64 bit PC, the Applet requires the user to run the browser as an administrator. When installing on a Macintosh (OS X 10.8.5 or newer), please download this file to your Macintosh HD/Library/Java/Extensions directory.Please replace the existing file with the same name.
Yes, the iDynamo 5 works with the iPad mini, iPad with Retina Display, iPhone 5, iPhone 5s, and iPod touch 5th generation.
Yes, QwickPAY is compatible with the iOS 6.
Yes, QwickPAY for iOS Rev 1.5.16 or newer is compatible with the iOS 7. Download
Yes. While connected to USB, the BulleT may communicate on either USB or Bluetooth. When the device is connected via USB, the first connection that establishes communication is used. For example; if a PC application is the first to open communication with the reader through USB, the cable connection will be the channel of communication. If the PC does not open communication with the reader, it is then able to communicate via Bluetooth.
Yes, as of August 2019, QwickPAY is EMV certified with four processors: First Data Merchant Services (FDC) Nashville/North, TSYS, WorldPay, and Chase EMV. For more information on the available EMV processors, please see the Get Started guide to QwickPAY.
Yes. QwickPAY for iOS and Android both accept card-present EMV transactions using eDynamo (via the Bluetooth interface). The QwickPAY Virtual Terminal accepts card-present EMV transactions using eDynamo, DynaPro and DynaPro Mini (all via the USB interface).
An EMV-ready QwickPAY Processor, QwickPAY Merchant Credentials that start with QPP and NOT MAG; a eDynamo or DynaPro device loaded with QwickDip firmware, Magensa’s default EMV tag load for the respective card readers.
PROCESSORS - Accepting EMV Chip card, EMV and NFC contactless, and magstripe transactions
PROCESSORS - Accepting EMV chip card and magstripe card transactions
PROCESSORS - Accepting only magstripe card transactions
Times vary depending on the host. Please see chart below:
| Host | Settlement Time |
| ACH | 7:00 PM PT |
| American Express | 7:00 PM PT |
| Amex APAC | 7:00 AM PT |
| Amex Brighton | 6:00 PM PT |
| CSIN | HOST BASED* |
| Elavon | 7:00 AM PT |
| FDRA | HOST BASED |
| First Data Nashville | 3:00 PM PT
7:00 PM PT 8:00 PM PT 9:00 PM PT (MAIN) |
| First Data North | 6:00 PM PT |
| First Data South | 6:00 PM PT |
| Global Payments Central | HOST BASED* |
| Global Payments East | 10:00 PM PT |
| Heartland Payment Systems | 12:00 AM** |
| Merchant eSolutions | 8:00 PM PT |
| Moneris | HOST BASED* |
| Paymentech | 3:00 PM PT |
| Paymentech Tampa | 7:00 PM PT |
| PayPal | HOST BASED* |
| TeleCheck | 1:00 PM PT |
| TSYS | 8:00 PM PT |
QwickPAY uses the device and/or PC's localized time when reporting transaction times.
Adding tips is easy. You can enter a specific amount or the application can calculate the tip based on a percentage of the sale. You can modify the Tip under QwickPAY Settings in the app Menu.
Please refer to the product user manual for the operating system you are using.
In QwickPAY you must select kiosk mode. Complete details are located in the iOS Operating manual.
QwickPAY includes the ability to specify what tax percent to use for each sale. This can be changed on the go, since tax rates vary from place to place. Modify the Tax under QwickPAY Settings in the app Menu.
1. Go to https://myqwickpay.com and log into your QwickPAY virtual terminal account.
2. Select SALE from the menu.
3. Select MANUAL ENTRY from the drop down menu.
4. You will see a CAUTION message warning you that card not present transactions are less secure. Tap or click CONTINUE to make the sale.
5. Manually enter the necessary card data and the amount you wish to charge. You can additionally add the customer's contact information by clicking on DETAILS. This allows you to keep a record of the customer's contact information and if an email address is collected, will also allow you to send a copy of the receipt to the customer after the transaction is processed.
6. Click on the SUBMIT button once you are ready to process this transaction.
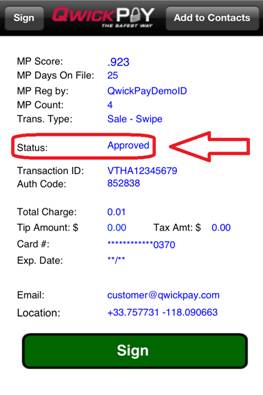
7. Once charged, you will see the approval or decline message.
8. Click on View Receipt if you wish to view, print or email the receipt.
NOTE: Hand keyed transactions are expensive, less secure and more likely to result in chargebacks. If you must hand key a transaction, you should also take an imprint of the card and obtain a wet ink signature in case of a chargeback dispute. While data entered manually is temporarily in the clear when entered on the device, it is protected through an encrypted SSL channel when transmitted.
The "Online" type is the only valid type.
When a call is received during a transaction, the user will be prompted to answer or decline the call. If the user declines the call, QwickPAY resumes as if no call came in and no data is lost. If the user accepts the call, QwickPAY saves the card swipe + camera image + amount to be charged. Customer details are not saved. When the call is ended, QwickPAY re-launches and the saved data is restored.
If the user is at the Submit screen or receipt screen, the transaction is already completed and data has been stored to the history. At this point, the receipt can be stored and sent later.
Approximately 50 KB or less per transaction if you are saving receipts. If no receipts, it is typically 20 KB or less per transaction.
The Gateway/Processor sets transaction restrictions – not QwickPAY. Please contact your Gateway or Processor for more details.
Yes. An update to the report will provide serial numbers, denoting which device/person executed the transaction.
Yes, QwickPAY treats Corporate Cards the same as any other card, with the Track 1 card data passing from the magstripe to the processor. If there are any contractual limitations or other restrictions on the card, then it is possible that the issuer may decline the transaction.
Please note that while the QwickPAY application reads Track 1 data from the card, displays the name (or company name), and prints the name on the receipt, the data sent to the processor depends on that processor’s API and the specific integration.
If a corporate card qualifies for a special B2B category on interchange, the transaction initiated by that card will qualify for that rate and the transaction will process normally. The QwickPAY application itself does not determine interchange rates.
1. Go to https://myqwickpay.com and log into your QwickPAY virtual terminal account.
2. Select SALE from the menu.
3. Select MANUAL ENTRY (Keyboard) from the drop down menu.
4. You will see a CAUTION message warning you that card not present transactions are less secure. Tap or click CONTINUE to make the sale.
5. Manually enter the necessary card data and the amount you wish to charge. You can additionally add the customer's contact information by clicking on DETAILS. This allows you to keep a record of the customer's contact information and if an email address is collected, will also allow you to send a copy of the receipt to the customer after the transaction is processed.
6. Click on the SUBMIT button once you are ready to process this transaction.
7. Once charged, you will see the approval or decline message.
8. Click on View Receipt if you wish to view, print or email the receipt.
Card not present transactions may also be performed using the MagTek IPAD by entering the PAN data , expiration date and CVV2 into its secure keypad. Please bear in mind that manually entered card data may result in a higher discount rate fee.
Yes, the QwickPAY Virtual Terminal can be used to perform a card not present transaction using the Sale/Manual Entry option.
Before requesting a batch be resubmitted for settlement, verify with your merchant bank and processor that the transactions in question have not been already settled. If you have then determined a batch needs to be resent for settlement, Magensa requires that you provide written authorization requesting the batch to be resettled.
This authorization indicates that you understand the risks in resubmitting a batch that Magensa has already submitted to your processor for settlement and that Magensa will not be held responsible for any ensuing problems that are the result of resubmission. If you wish to proceed with resubmission, send your signed request on company letterhead by email to support@qwickpay.com.
Liability statement:
To Magensa,
I am requesting that Magensa resubmit Batch # ____ dated ____________ for a total amount of __________ for settlement.
I further understand that I will not hold Magensa responsible for the aforementioned submission and that I take full responsibility for the resubmission of said batch for any issues that may arise from this request such as; duplicate charges, additional transaction and discount fees, customer complaints or any other ramifications pursuant to this resubmisson.
Signed / Dated
_________________________
Yes. If QwickPAY processes a card-present EMV transaction, the receipt generated by QwickPAY will show the appropriate EMV transaction data.
The Terminal Name is a name that identifies the device or computer where a QwickPAY transaction originates from. In the Virtual Terminal, you can assign a name to the computer/browser where a Virtual Terminal-based transaction was performed (ex - Joe's Front Desk Computer). Once set, you will be able to view transaction history and sort the transactions by Terminal Name using the Standard or Custom Reports.
Note: Android and iOS Device Names are found and set in their respective operating system's settings. They are auto-saved by QwickPAY in the database field named Terminal Name. This provides for unified transaction reporting from multiple QwickPAY platforms.
Go to the QwickPAY Virtual Terminal and then Settings. Choose Terminal Name and enter a name that you prefer to be assigned to transactions that originate from that computer/browser. Virtual Terminal-based transactions that originate on an Android or iOS mobile browser will also use the Terminal Name set here and NOT use the Android or iOS Device Names described in the FAQs 'How do I set a Terminal Name in the iOS version of QwickPAY?' and 'How do I set a Terminal Name in the Android version of QwickPAY?'.
On your iOS device, choose Settings, General, About and Name. The description in this field will be saved with all QwickPAY transactions and be reported as the "Terminal Name" for transactions that originate on that iOS device.
On your Android device, choose Settings, System, About and Model Number. The description in this field will be saved with all QwickPAY transactions and be reported as the "Terminal Name" for transactions that originate on that Android device.
A record of each transaction is accessible in the application menu "History" and in the QwickPAY Virtual Terminal under "Reports" located at https://myqwickpay.com. The virtual terminal ONLY supports History information for a maximum of 90 days.
QwickPAY supports Sale with EMV Card Present Transactions, Swipe Transactions, Sale with Qwick Code Transactions, Sale with Manually Entered Card Data, Voids and Refunds.
No, you will not lose any data by upgrading the app software to the latest version.
When you delete the app and reinstall QwickPAY on your device, you will lose all saved data on your phone. However, you may still access all of your transaction history by logging into the Virtual Terminal even after deleting the app on your phone.
To remove the application from your device and reinstall QwickPAY, press and hold the app icon until it is wiggling and displays a small 'x' in the top left corner. When you click on the 'x' a message will appear on the screen telling you that "Deleting 'QwickPAY' will also delete all of its data." Tap the "Delete" option and click on the Home Button to make the app icons still again. Now you may return to the App Store to download and reinstall QwickPAY.
This is at the discretion of the user; a warning message will appear when the memory is near the limit.
Refunds can only be applied to the original card.
Yes. If the original transaction was done via QwickPAY, the home office can utilize the same credentials with the QwickPAY Virtual Terminal to issue a refund.
You can perform a void on any sale transaction that has been submitted for payment but has not yet been settled.
The easiest way to perform a void is to launch the QwickPAY mobile app and then press the Menu button in the upper right hand corner of the screen; then select History. The most recent transactions are listed first. Next, select the transaction to be Voided and its details will display. Press the void button in the upper right hand corner of the screen and it will automatically launch the Trans.Void screen where it will populate the Transaction ID to be voided. When ready, press the Submit button to void the transaction. If preferred, you can have the customer Sign the receipt indicating the transaction was voided and have an optional receipt sent to them by email.
Another way to perform a void is to launch QwickPAY mobile app and choose the Trans.Void transaction from the transaction options listed in the upper left corner of the screen. Next, enter the original Transaction ID from the transaction you wish to void. When ready, press the Submit button to void the transaction.
You can perform a refund on any sale transaction that has been settled.
The easiest way to perform a refund is to launch the QwickPAY mobile app and then press the Menu button in the upper right hand corner of the screen; then select History. The most recent transactions are listed first. Next, select the transaction to be refunded and its details will display. Press the refund button in the upper right hand corner of the screen and it will automatically launch the Trans.Refund screen where it will populate the Transaction ID to be voided and the original Sale Amount which can be adjusted by pressing the Amount field and launching the keyboard. When ready, press the Submit button to refund the transaction. If preferred, you can have the customer Sign the receipt indicating the transaction was refunded and have an optional receipt sent to them by email.
Another way to perform a refund is to launch QwickPAY mobile app and choose the Trans.Refund transaction from the transaction options listed in the upper left corner of the screen. Next, enter the original Transaction ID from the transaction you wish to refund along with the Amount you wish to refund. When ready, press the Submit button to refund the transaction.
Please log into your account on https://myqwickpay.com; click on "Receipt Settings". You will be able to upload a logo and edit your Header/Footer.
To verify that your transactions are being processed correctly, login to the QwickPAY Virtual Terminal using your Merchant ID and Password. The instructions below explain how to run custom transaction reports for days, weeks, or up to 3 months of transaction history.
NOTE: Each daily batch may take 1-3 business days before showing up in your account. If you believe there was an error processing any of your transactions, please contact your processor.
1. Log into the Virtual Terminal at https://myqwickpay.com/login.aspx using your QwickPAY merchant account credentials. These are the same Username and Password you received via email when you originally signed up for QwickPAY.
2. Once you have logged into the Virtual Terminal, click on "Standard or Custom" located under the "REPORTS" section in the left-hand menu.
The Standard Report is designed to act as a "Daily Report". The merchant should run this report every day and it will report on that day's transactions. It has a defaulted "From Date" of TODAY (which can be overridden to any date back as far as 90 days) and an implied "To Date" of TODAY which cannot be changed. (This requires very few buttons or options to click to run the report)
The Custom Report is designed to let the merchant get more granular with what to show/not show and for what data range (as long as it does not exceed 90 days). Reports go as far back as 90 days for a Start Date (FROM) with an End date (TO) of any day up until and including TODAY.
3. Select the date range for which you would like to run the transaction report. When you have selected the desired transaction history dates, click on "Get Report" at the bottom of the page.
4. The report generated will look similar to this:
Please note: The reporting functionality has been significantly enhanced. Both Standard and Custom reports have been modified to summarize all Approved Transactions by Date Range and individual days. This will allow the merchant to better understand the "cash impact" to their business as a result of how Sales are offset by Voids and Refunds (what we used to label as Totals at the bottom of the reports). If there are NO Approved Transactions for a given Date Range, the summary tables (Transaction Summary and Daily Transaction Summary) will not display, but the Transaction Log will still report any line item transactions that took place for the given Date Range. The Transaction Log will still allow the Merchant to export to CSV. This export will not include the new summary tables of Approved Transactions.
This feature is currently only supported on Apple iOS devices. To display the GPS coordinates of each transaction on your receipts, open the Settings menu from your home screen and select “Location Services”. Tap the ON/OFF toggle switch to the right of the QwickPAY (or QwickPAY Lite) app to turn location services on or off.
Note: When you launch QwickPAY or QwickPAY Lite for the first time, the app will request the use of your current location. If you select “OK,” the GPS coordinates of each transaction will automatically appear on all of your receipts. If you select “Don’t Allow,” then these coordinates will not show up on your receipts, unless you manually adjust your phone settings as described above.
Browse to https://www.magtek.com/support/edynamo/firmware and follow the instructions. Note, you will also need the Magensa default EMV Tags.
Browse to https://www.magtek.com/support/dynapro/firmware and follow the instructions. Note, you will also need the Magensa default EMV Tags.
If you enter your password incorrectly 5 times, your account will automatically lock and you will need to reset your password by going to the QwickPAY Virtual Terminals login page at https://my.QwickPAY.com. Locate the Reset Password link and follow the onscreen instructions.
NOTE: When you change your password on the Virtual Terminal, please make sure you also change your password in the application on your phone/mobile device. QwickPAY Customer Service will not be aware of your new password so please be sure to keep a record of this in a safe place for future reference.
Yes. Go to Settings and Reader Configurations in the QwickPAY Virtual Terminal and choose how to connect to your card reading device and then press the Submit button. Note, you will ALSO need to configure the MagneFlex Navy to select your card reading device.
This error code means that the QwickPAY Password in the QwickPAY Application is invalid.
This error code indicates an issue with the account creation and could mean that the Merchant ID, Bank ID, or Terminal ID is incorrect. You will need to confirm the account creation by contacting QwickPAY customer service at (651) 415-6800 or support@qwickpay.com.
This message indicates that you have entered the wrong password. If you have changed or forgotten your password, you will need to contact QwickPAY Customer Service to report the problem and reset the account.
Please make sure that you have downloaded the latest software for your device and that you are using an iOS device version 4.3 or greater: iPod touch 3rd, 4th and 5th generation, iPhone 3GS, iPhone 5, iPhone 4, iPhone 4S, iPad, iPad 2, and iPad 3rd generation, and iPad with Retina Display.
If you are using an iOS Apple device with a protective case, please be sure to remove the case so that the iDynamo may dock properly.
If you are still having difficulty, the issue may be with the connector on your device. Please check in to your local Apple Store for cleaning or servicing of the device.
Please ensure the iPhone's Time Settings are set to Automatic. Click on Settings > General > Date & Time and slide the "Set Automatically" bar into the ON position.
This error message refers to a problem with the WiFi connection. You may confirm this as a WiFi by attempting to download an application in the App Store as this problem will show there as well. One work-around for this problem is to turn off the WiFi on your device and try again through your phone's data service. If the issue is with your router, you will need to reset the modem and router as instructed by your service provider.
One possible cause may be a communication issue with a wireless Wi-Fi router. To correct this problem, you may need to turn off Wi-Fi on your mobile device and send QwickPAY receipts using your phone's data carrier. If you continue to receive an error message when attempting to e-mail a receipt in QwickPAY, please contact one of our representatives at support@qwickpay.com or 651-415-6800.
You may have a poor 3G, Edge, or Wi-Fi connection. Signal strength is not always an accurate indicator of a stable internet connection. It is advised that you try using a different connection type. For example, if you are currently using 3G, switch to a Wi-Fi connection.
The Edge Network may be susceptible to magnetic noise interference and, therefore, may require multiple card swipes to complete the transaction.
The most likely cause is weak or lost Data or Wi-Fi coverage after the transaction was submitted (“Submit” was pressed) but before the transaction approval message appears. You will see a timeout message in this case. However the transaction may have successfully completed, even if it does not appear in the transaction history of your device. QwickPAY has no control over the Data or Wi-Fi coverage being weak or “No Signal” at certain times or locations.
If you pressed the green Submit button and the transaction came back as "Approved," this indicates the transaction has been completed successfully. You can confirm the transaction was approved by checking the Virtual Terminal and running a transaction report.
If the app timed out after you hit Submit (again, primarily due to a weak Data or Wi-Fi signal) and you re-submitted the transaction, you should check for a duplicate transaction in the Virtual Terminal. NOTE: Duplicate transactions will only occur if the transaction was re-submitted. To correct the duplicate, if the payment was processed but not yet settled into your bank account, you would perform a void transaction. If it has already been settled, a refund should be performed.
These responses come from either the processor or the cardholder's card company. If the card was declined, the cardholder and/or the merchant will need to contact the card company or processor. QwickPAY does not accept or decline cards or transactions. "Referral" means that the cardholder will have to contact the card company to find out why the transaction was not approved. The merchant may also contact the QwickPAY reseller who set up the merchant’s processor account to find out why they received this response. To submit the transaction with a verbal authorization, the merchant or the reseller will need to contact the processor since QwickPAY is not set up for verbal authorizations.
This error indicates that the card type being used for the transaction was not included in the initial set up for the merchant account, the QwickPAY account, or both. The merchant needs to contact the QwickPAY reseller who set up the account and confirm that the card type is set up with the processor and with QwickPAY. Both entities must have the card type flagged as an acceptable card type or it will not work.
NOTE: Should changes to the account on the processor side be needed or advised, QwickPAY cannot work with the processor to make changes to the merchant account; ONLY the QwickPAY reseller and/or the merchant can request the processor perform any changes to the account.
QwickDip was developed to support Quick Chip, M/Chip Fast, AMEX Quick Chip and Discover Quick Chip. It leverages a simplified transaction process, making it twice as fast as standard chip card transactions, but still delivers all of the security.
Standard chip card transactions require part one to send the data to the bank and then part two to send the data back from the bank to the reader. With QwickDip, there is no need to wait for the return message from the bank, cutting the transaction time in half while making EMV transactions safe and more convenient for merchants and consumers.
If a payment card looks altered or suspicious or a cardholder makes you feel wary you can discreetly discuss with your supervisor to determine if a Code 10 alert should be made. Key reasons to consider a Code 10 are:
Code 10 is a voice authorization alert that allows you to prevent the use of a fraudulent card at the point of the transaction, or even after the cardholder has left the location in order to prevent possible future fraudulent transactions.
Once you contact the card brand or Merchant Processor's alert line let them know you have a Code 10 authorization request. The operator will ask you a series of questions and they will determine authorization for a Code 10.
Following are security features for four of the major card brands.
If you suspect fraud call 800-528-2121 to make a Merchant Code 10 Alert.
If you suspect fraud call 800-528-2121 to make a Merchant Code 10 Alert. Call 800-347-3083 if you wish to contact the Law Enforcement line
If you suspect fraud call your merchant processor.
Still can’t find the answer? For assistance, please contact your QwickPAY supplier or email us at support@qwickpay.com.